Zero‑Trust IoT lab at home (ESP32 + OpenWrt + mTLS + IDS + Honeypot)
ESP32 talks MQTT over mTLS to the cloud, the IoT Wi‑Fi is isolated on its own VLAN, traffic is watched by Suricata, attackers are lured into a Cowrie honeypot, and I glued the logs into a tiny Flask dashboard. Total cost was lot of coffee + an intensive 3 weeks of troubleshooting + ~$150 in hardware.
If you want the code/configs: GitHub → zero-trust-iot. I’ll keep refining it as I go.
If you don’t care about this blog and wants the offical report, here you go: Google Drive → Detailed PDF Report
Why I did this (and what I wanted)
I needed an end-of-studies project for my bacholers degree that wasn’t another “blink the LED project”. And as a human being that loves to envlove networking and security into all discussions. I ended up doing all this work for a bacholers project, which is overkill, I SAW THAT ON THE JURY FACE.
1. Network Segmentation (VLAN Isolation)
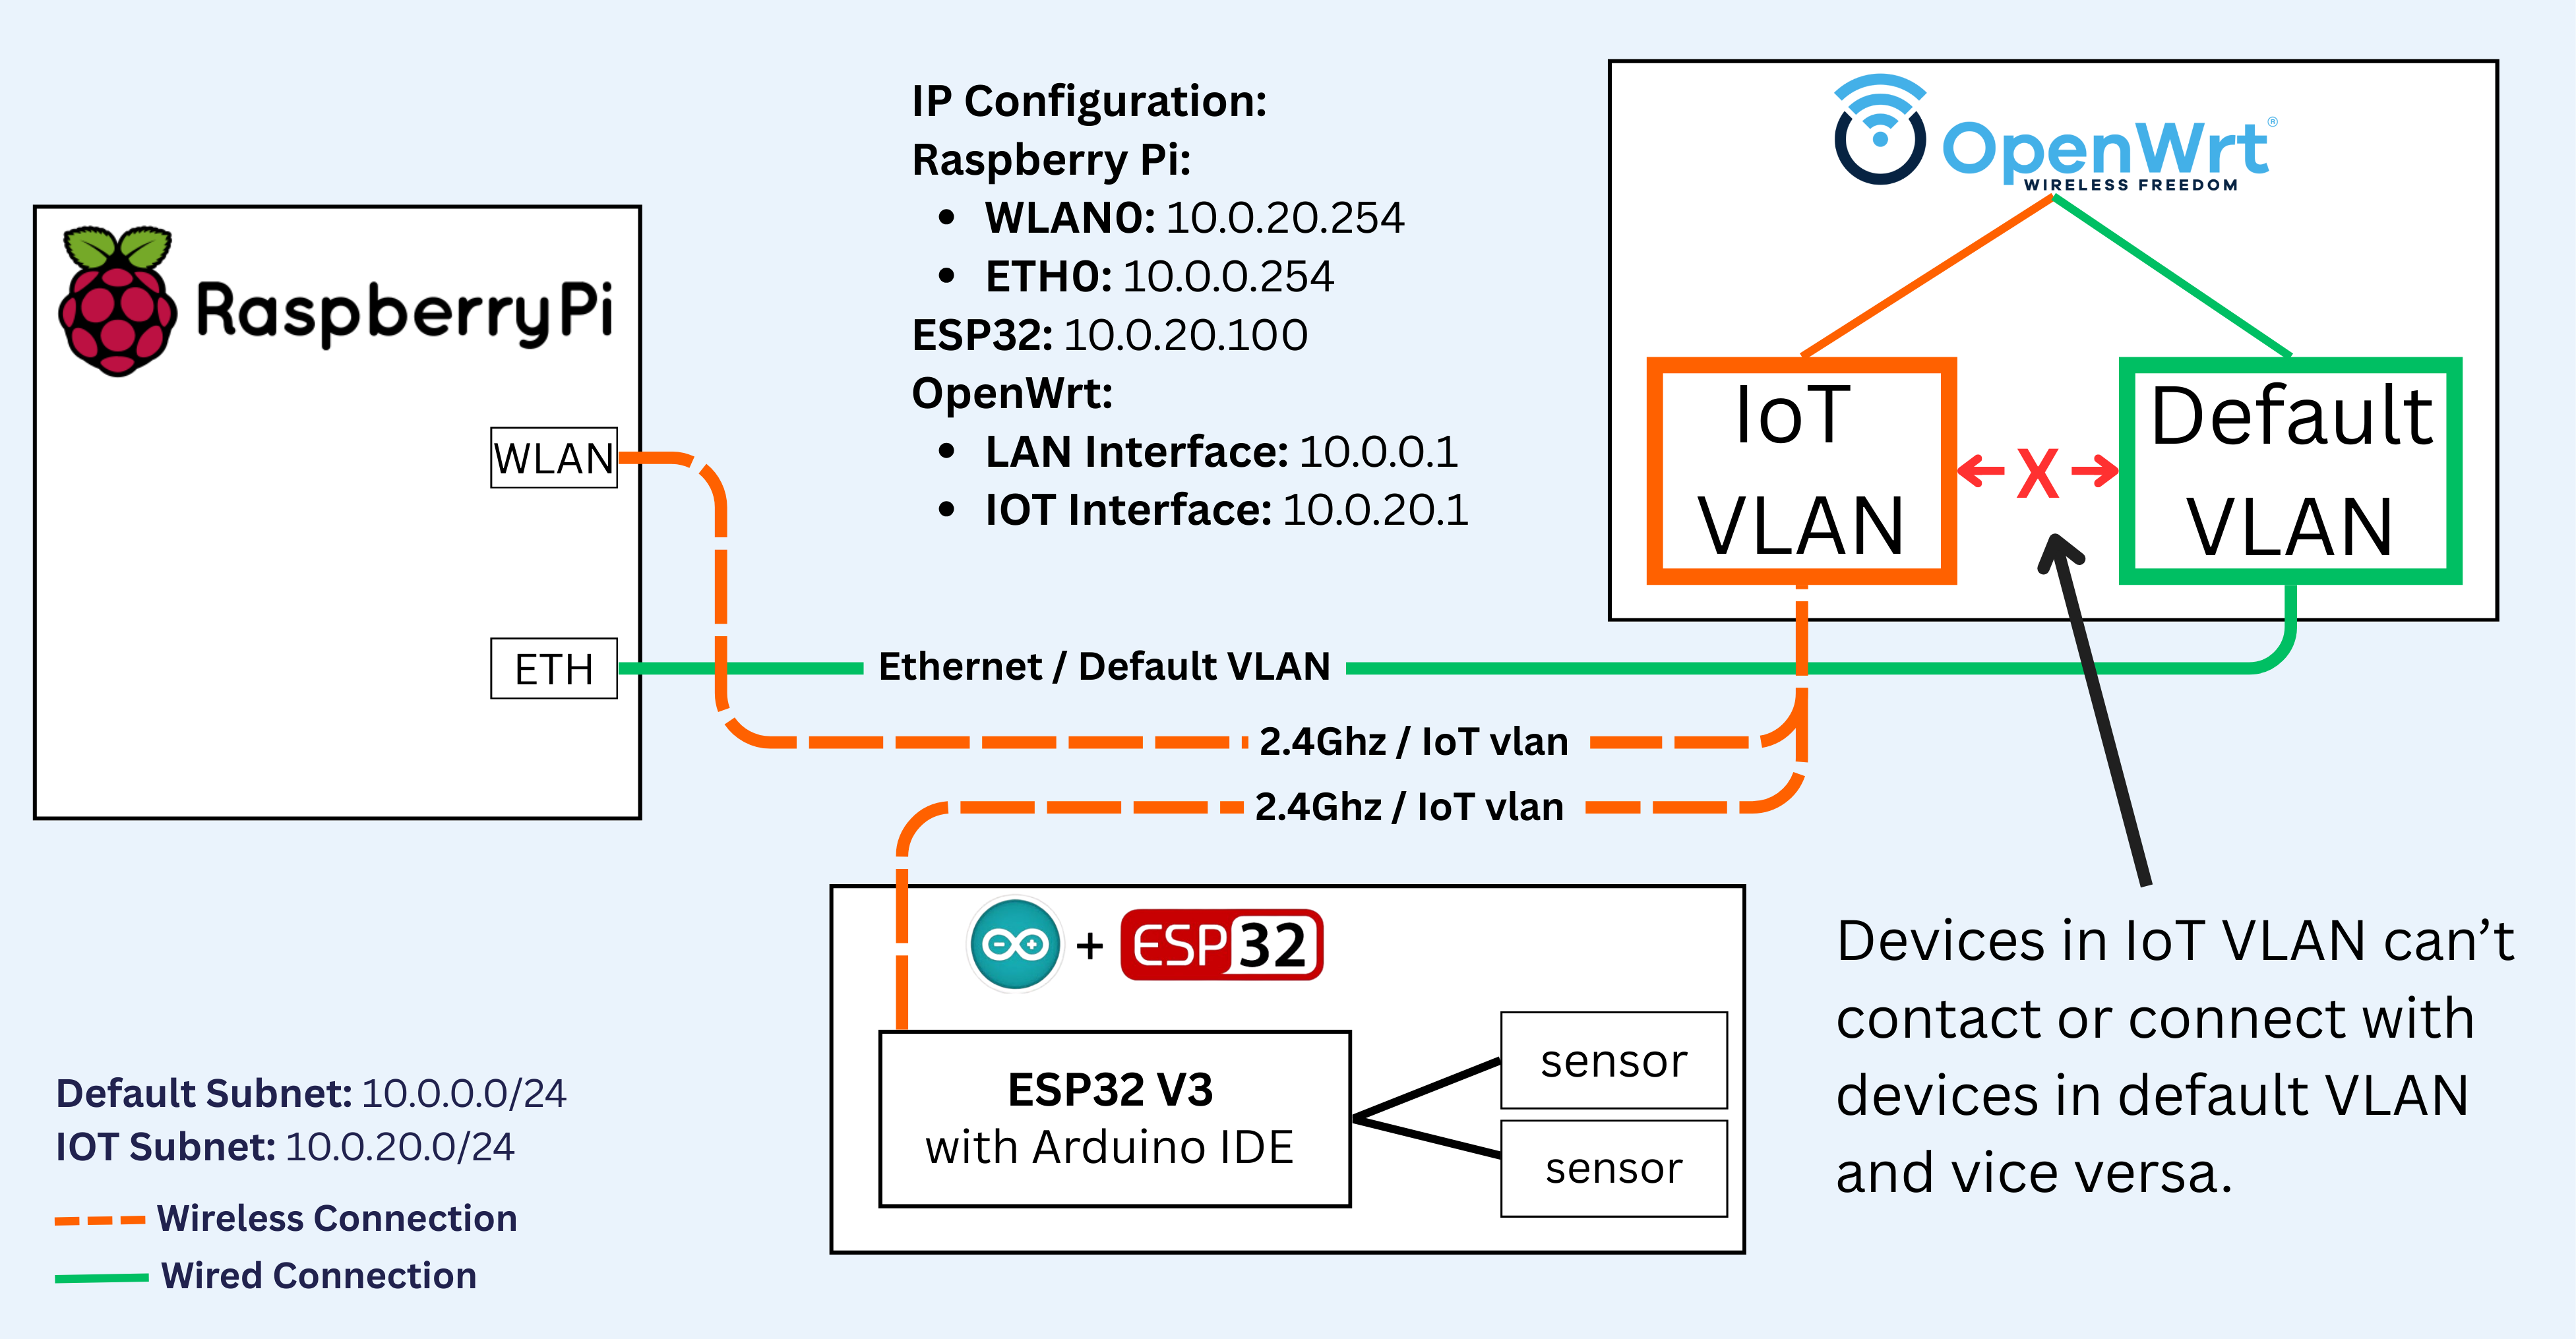
- Default VLAN (10.0.0.0/24): default LAN
- IoT VLAN (10.0.20.0/24): Complete isolation for IoT devices
- Firewall rules preventing inter-VLAN communication
- OpenWrt router providing enterprise-grade network control
I bought a medium budget Xiaomi ax3000t router back then in 2023 from Aliexpreice for about 30 USD.
I flashed it to the latest OpenWRT image 24.0.10. And it was stable and so much fun to work on compared to the out-of-box system. OpenWRT is one of my goes right now.
2. Certificate-Based Authentication (mTLS)
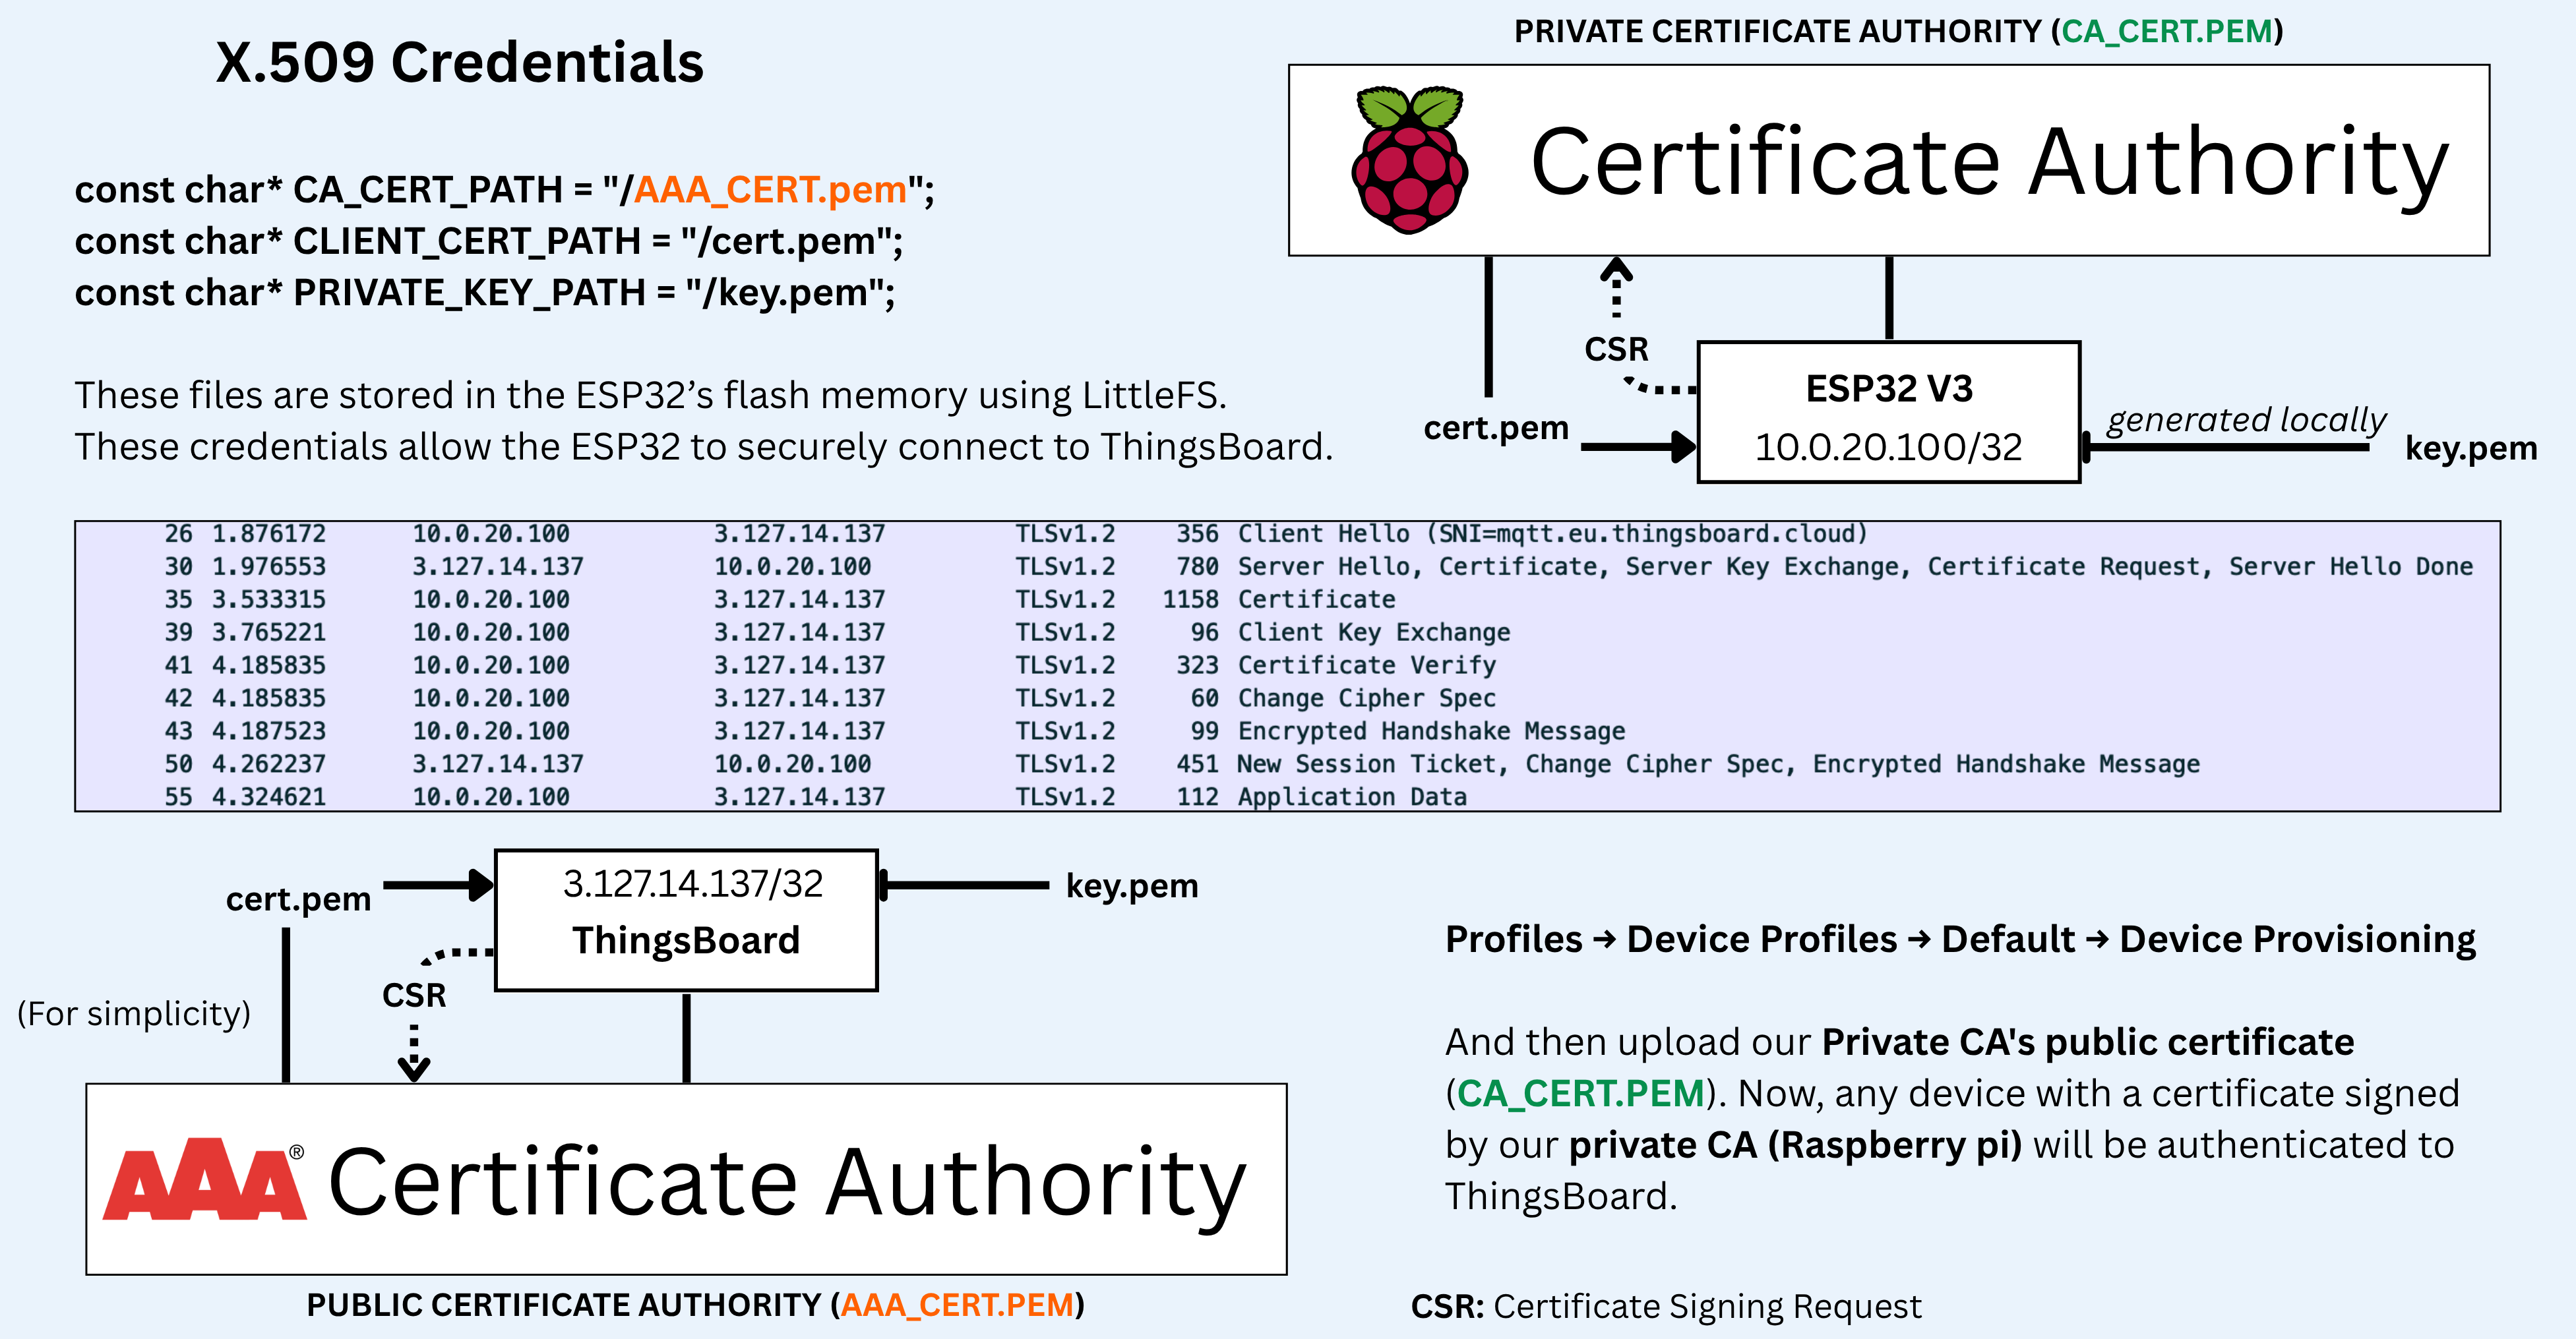
- Private Certificate Authority on Raspberry Pi
- X.509 certificates for the ESP32 which plays as a gateway for all sensors
- Mutual TLS (mTLS) authentication, therefore zero-trust
- On-device key generation ensuring keys never leave the device, the C++ code is here
I used a Raspian OS lite in my RP 5 8RAM, then i used OpenSSL to generate the private key then public key and so on. So my whole PKI is hosted in my RP.
At first i generated the EPS32’s private key at raspberry pi then i used SFTP to transfer it to my PC then to ESP32 code, but then I managed to make the ESP32 generate its own private key to avoid any leak of the private key, SFTP is secure but making the key never travles is securer.
Also managed (I SWEAR TO GOD THAN I SPEND 6 DAYS ONLY ON THIS) to upload the private key and public key of ESP32 and public key of COMODO which signed the ThingsBoard cert into my ESP32 flash memory using LittleFS. The plugin is below:
3. Real-Time Threat Monitoring
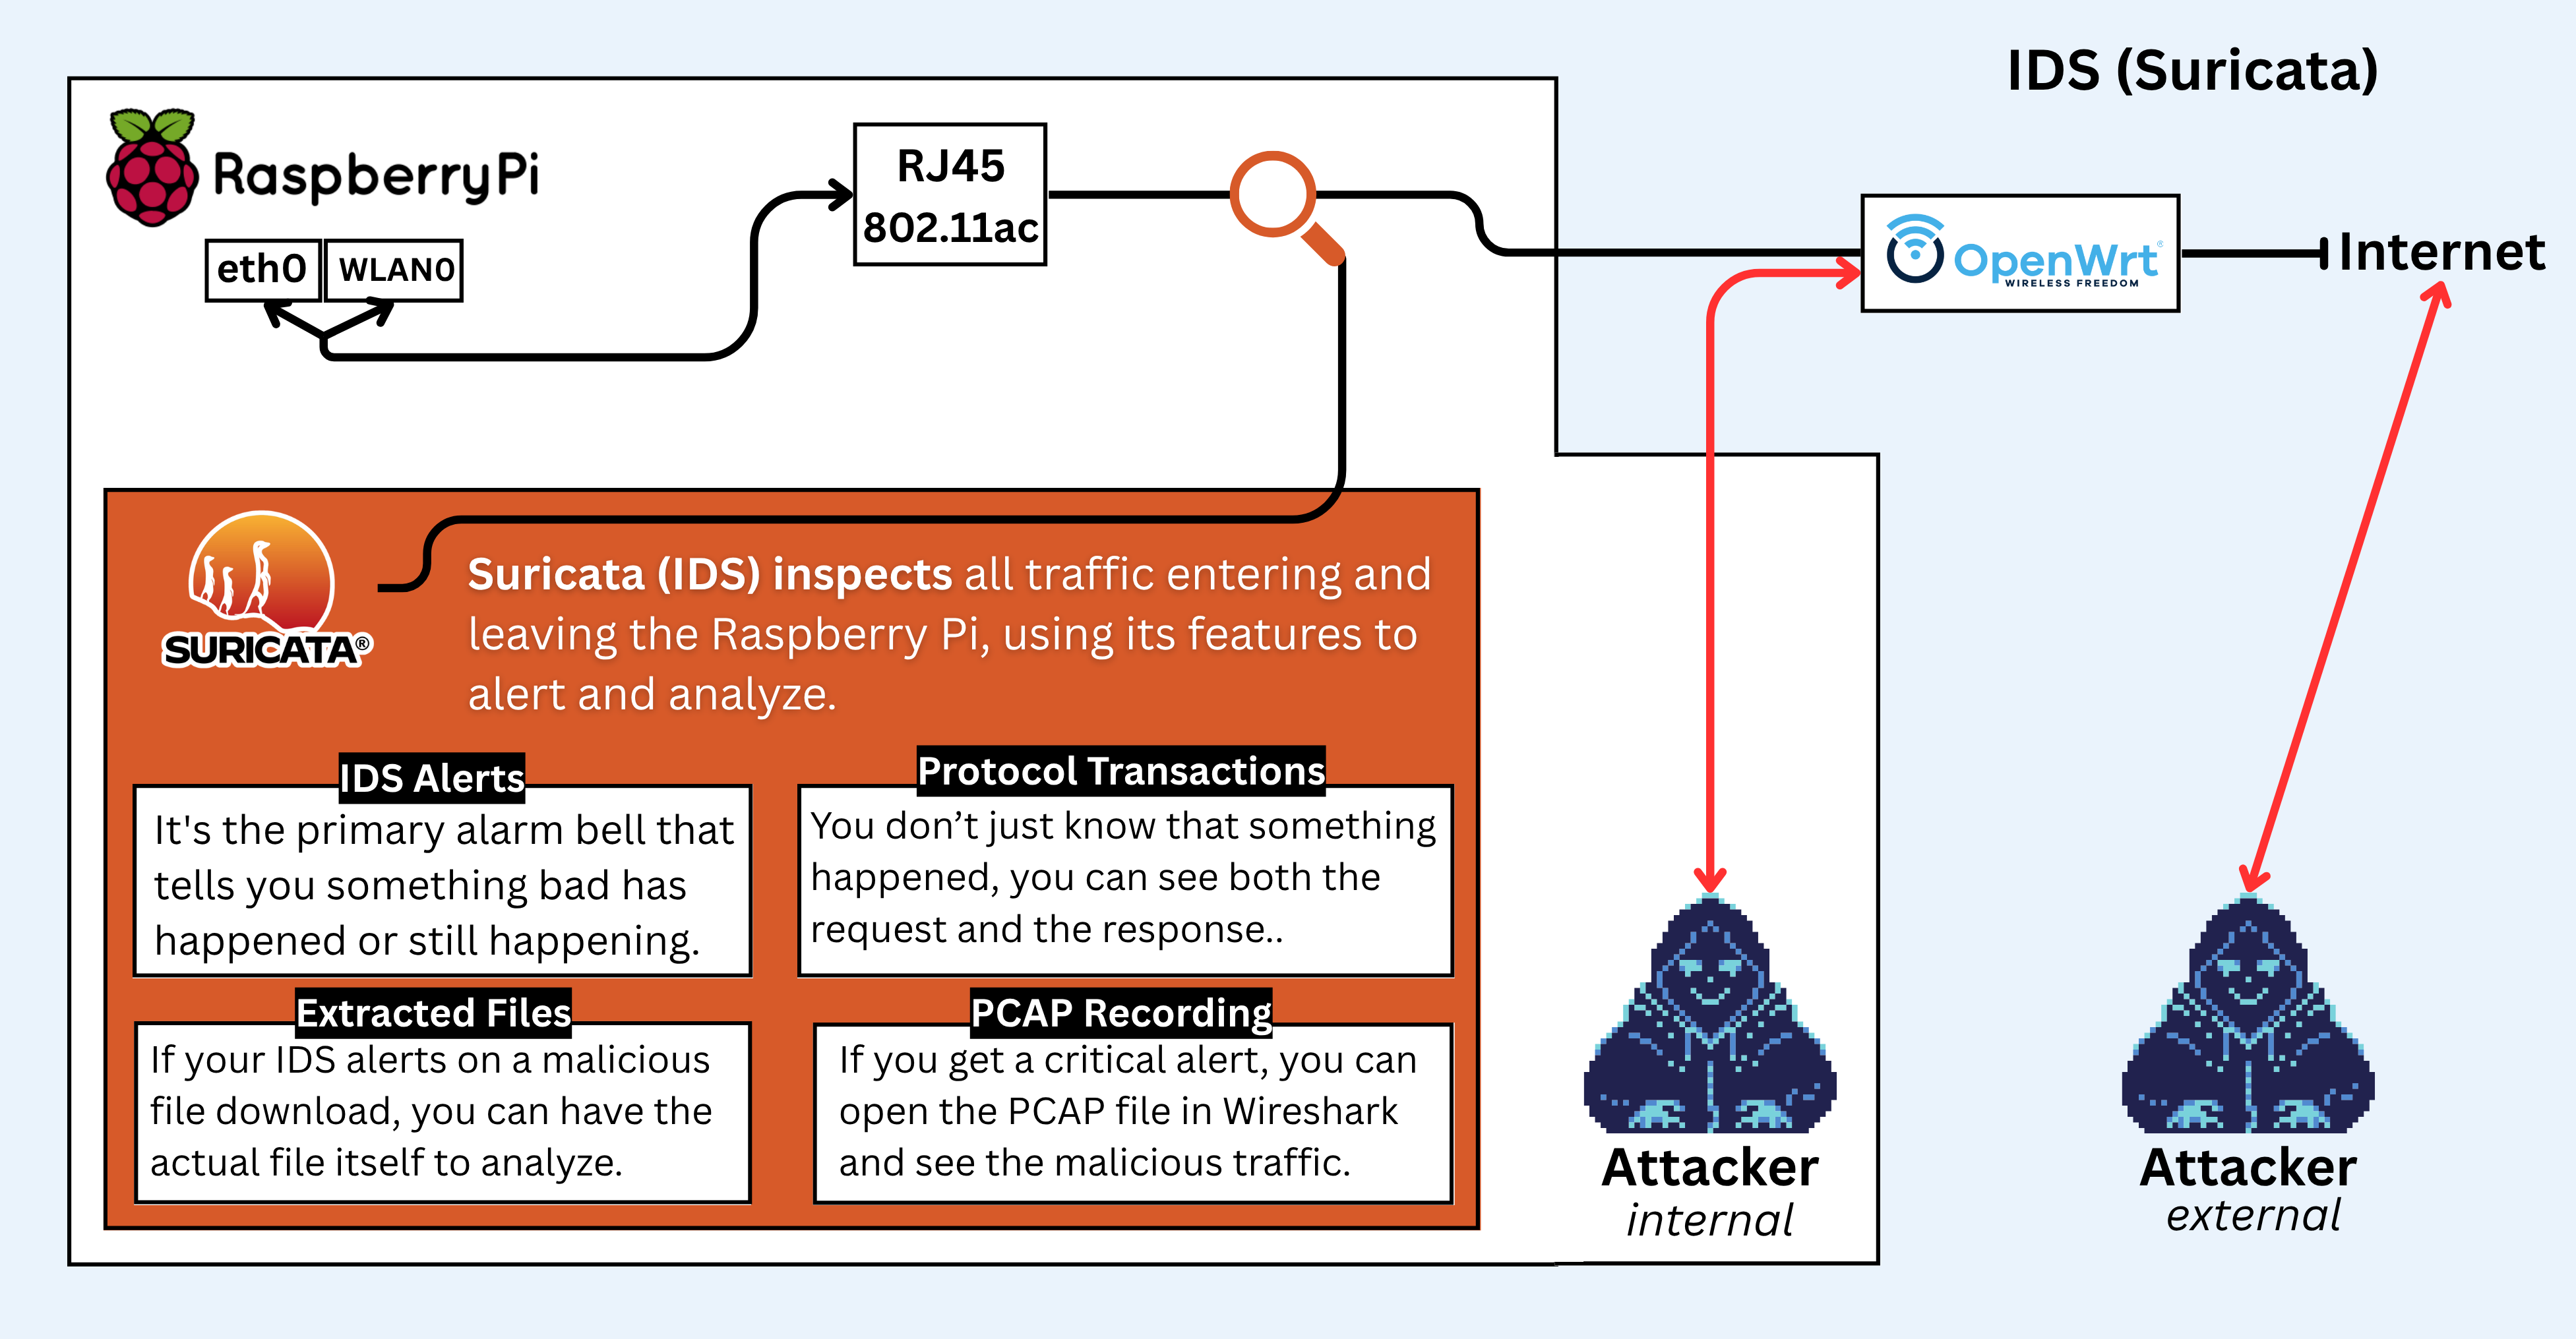
- Suricata IDS analyzing all network traffic
- Cowrie honeypot detecting unauthorized access attempts
- Automated alerting via Telegram with <2.3 second response time
- Centralized logging with Flask web dashboard
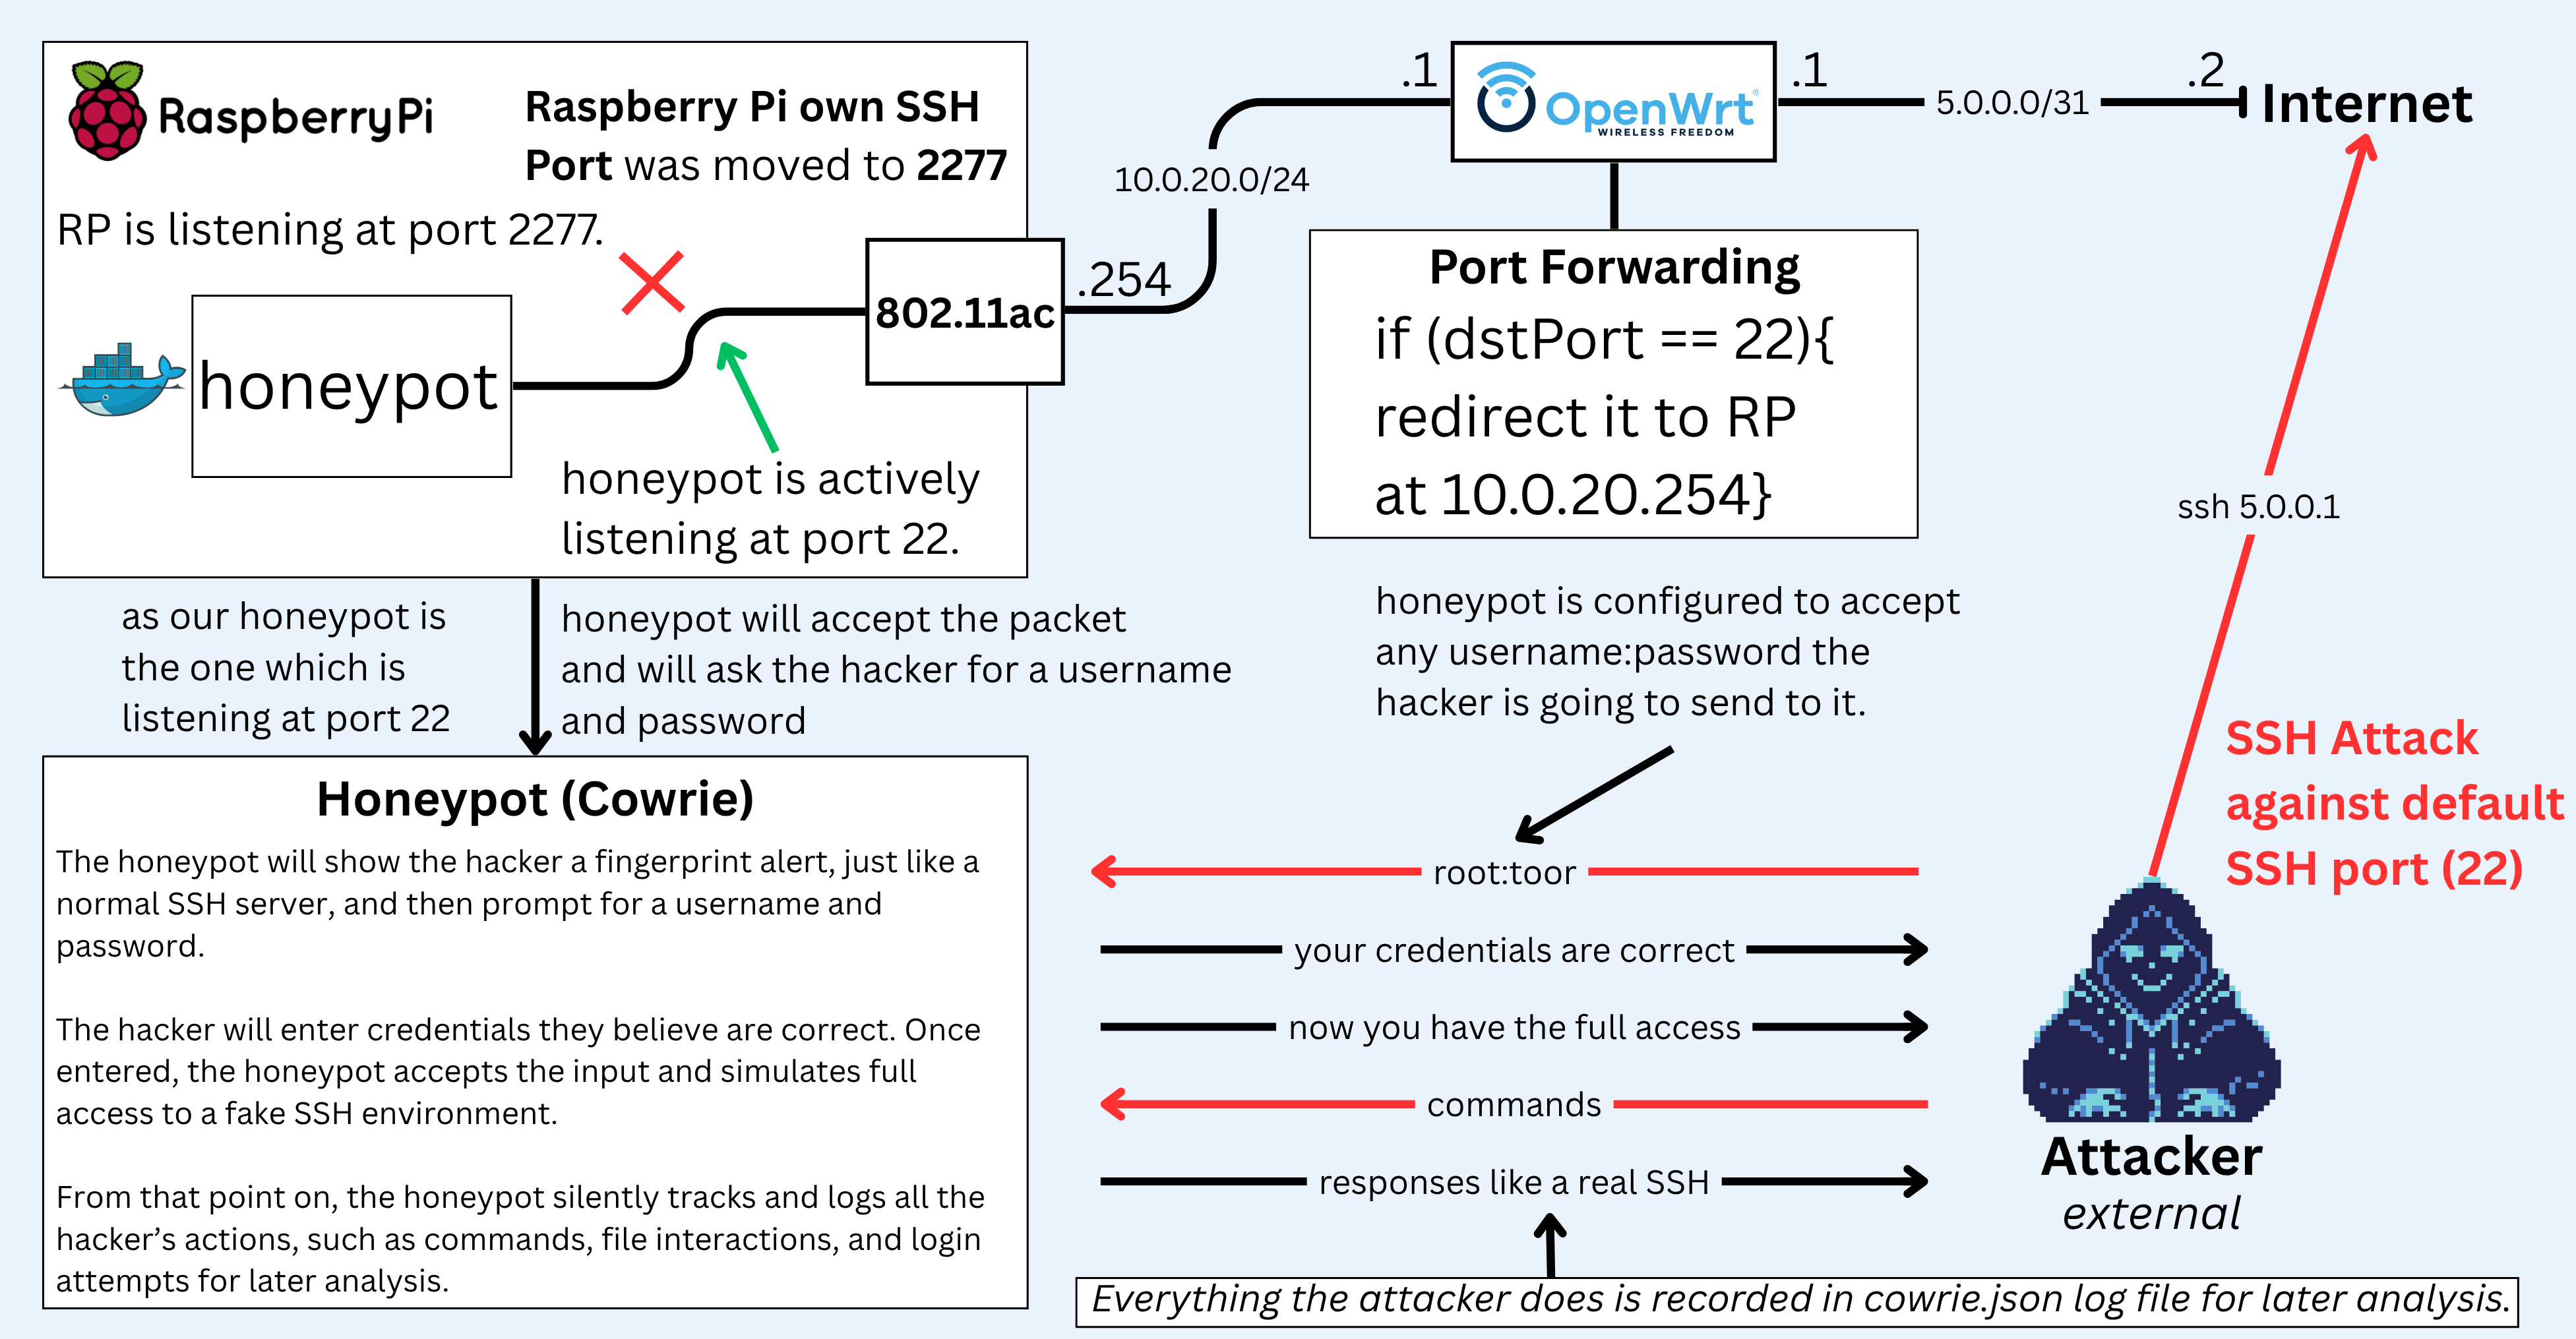
If i ask you which is better in a general terms, to block all SSH attempts or redirect them to a honeypot? You would ratlerly asnwer block them! I agree, but for some drama and practice reasons i implemented port forwarding in my OpenWRT router so it will redirect all SSH requests to my honeypot.
4. End-to-End Encryption
- TLS 1.2 with strong cipher suites (AES-256-GCM)
- Perfect Forward Secrecy protecting past communications
- Certificate validation at every connection
- Encrypted MQTT communications to cloud platforms
Weeks of work, but felt nothing when i saw that list of packets in wireshark, look how beatiful this is!
Results Summary
| Metric | Result |
|---|---|
| Total Cost | $150 USD |
| Setup Time | 3 weeks (most are debugging) |
| Threat Detection Rate | 100% (all test attacks detected) |
| Average Alert Time | 2.3 seconds |
| Raspberry Pi CPU Usage | 6% (full security stack) |
| Network Isolation | 100% (zero cross-VLAN communication) |
| ESP32 TLS Overhead | <5% |
| Supported IoT Devices | 50-70 (limited by router RAM) |
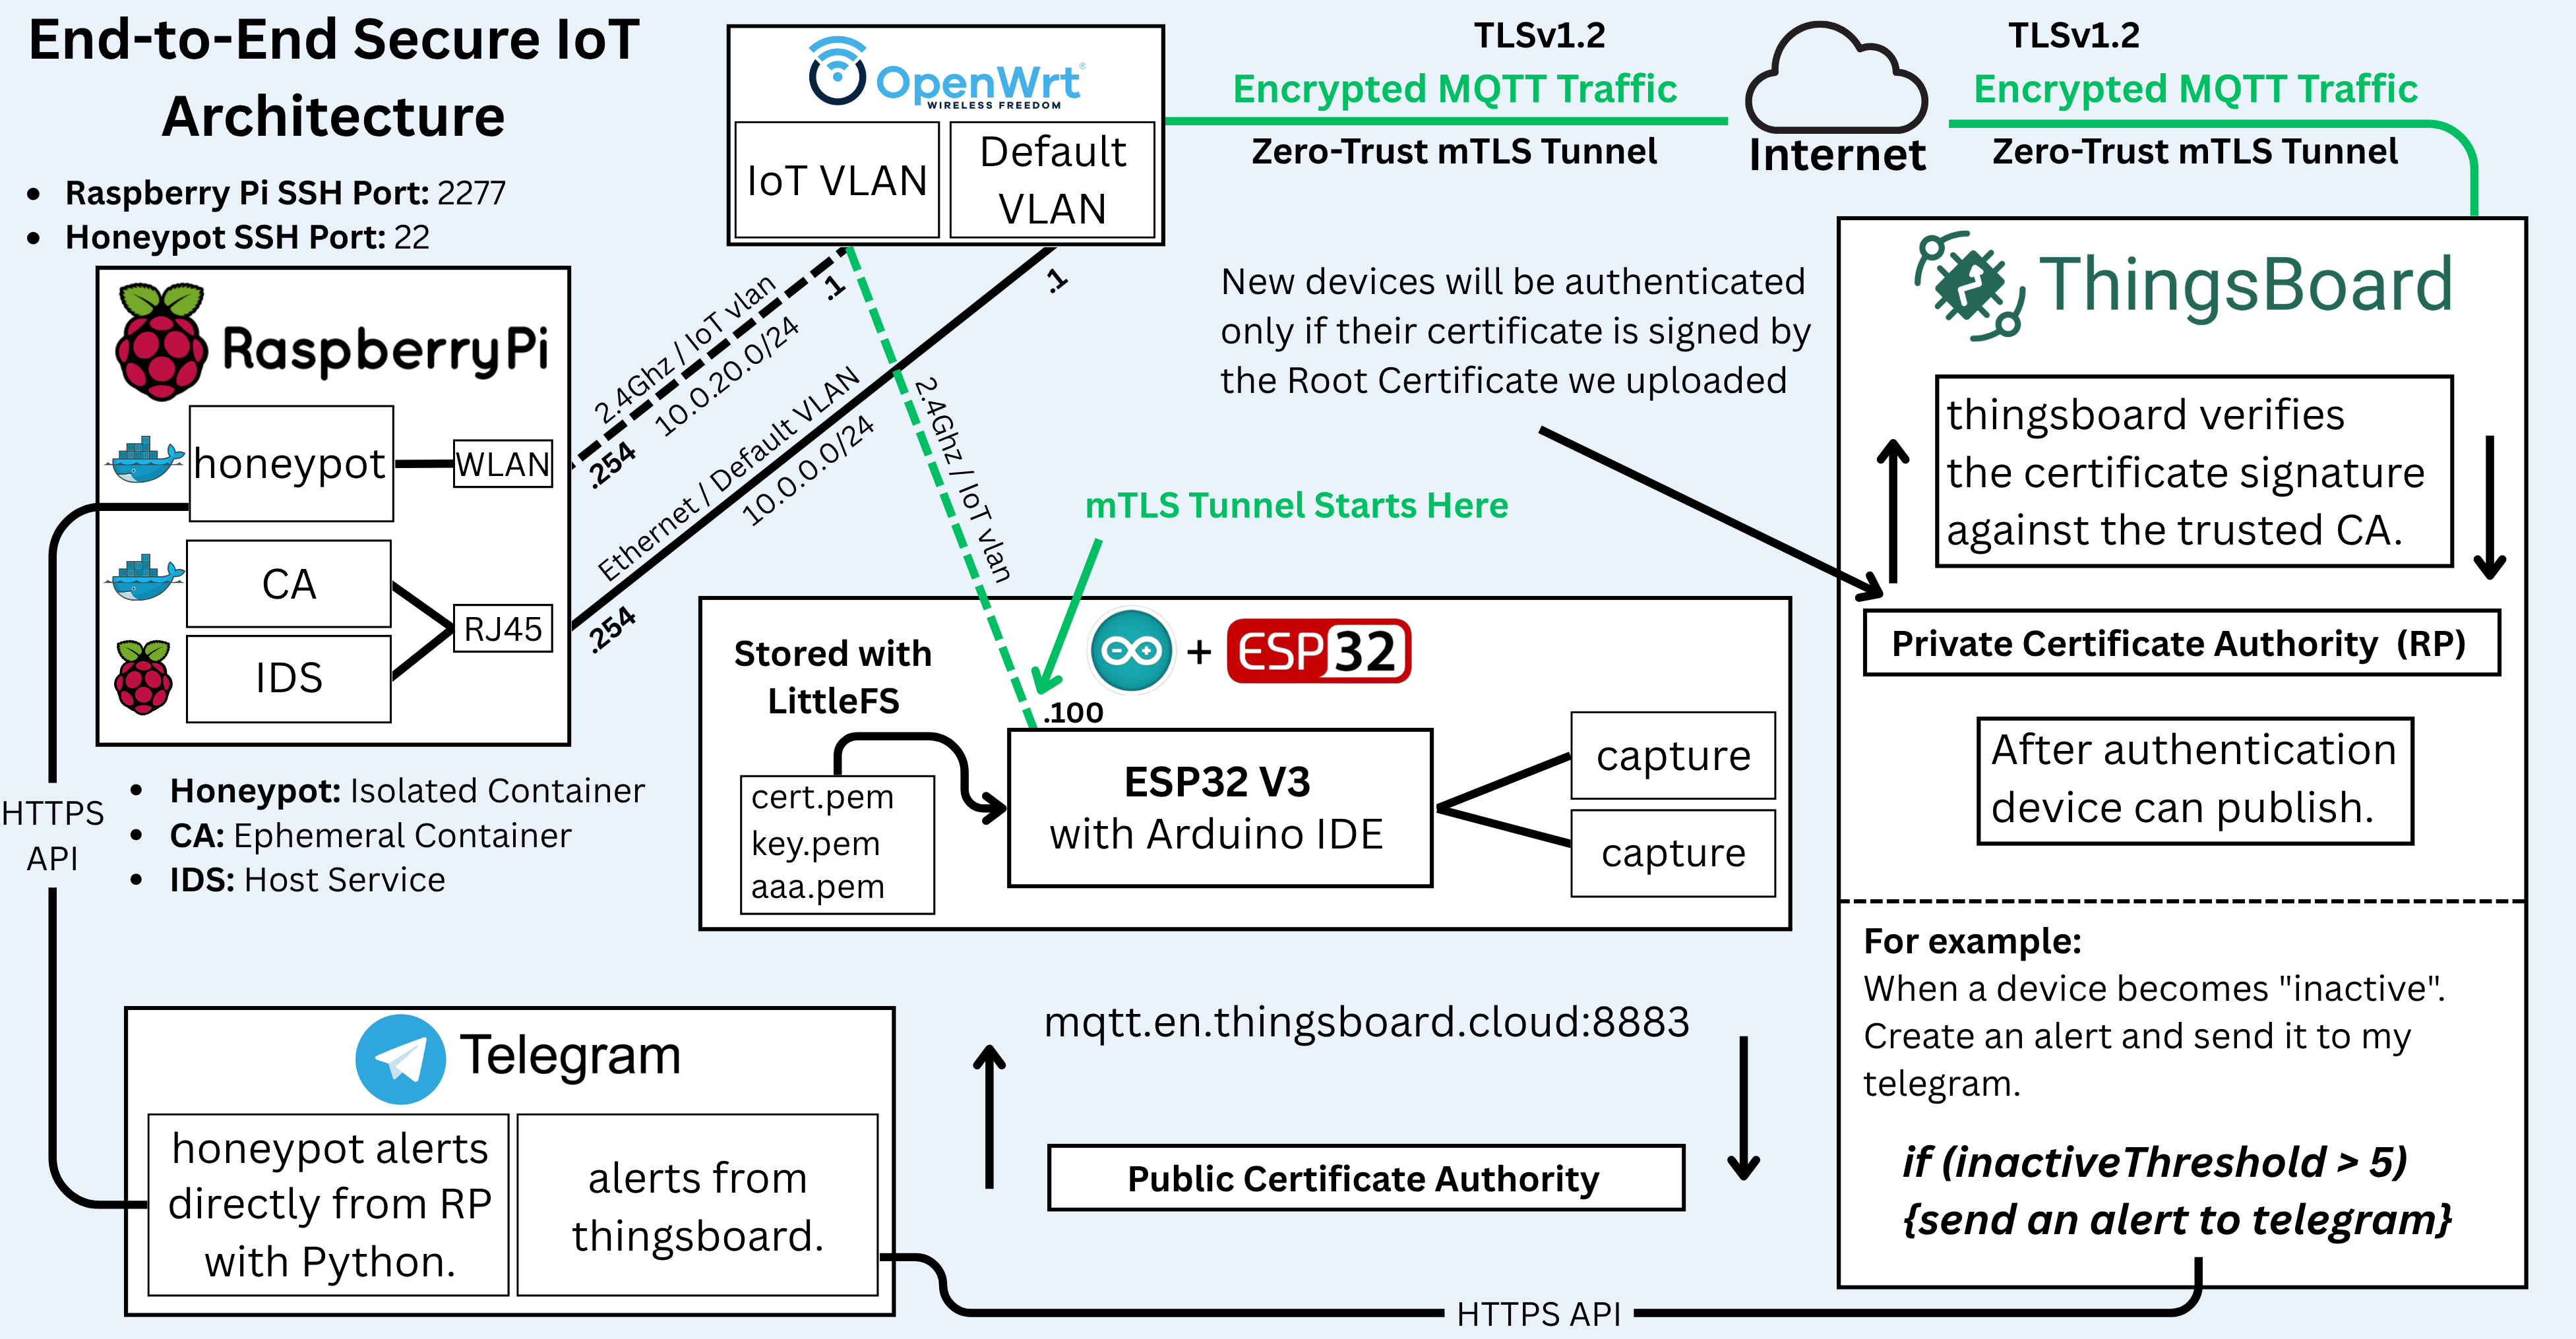
Architecture (one paragraph you can screenshot)
OpenWrt splits the network into VLANs: 10.0.20.0/24 for IoT, 10.0.0.0/24 for default LAN. A Raspberry Pi runs a private CA, Suricata IDS, a Cowrie honeypot (Docker), and a small Flask dashboard. ESP32 device store its X.509 cert + key in fash memory using LittleFS and publish telemetry to ThingsBoard over MQTT-over-TLS 1.2 with mutual authentication on mqtt.eu.thingsboard.cloud:8883. Anything not explicitly allowed is blocked. If something noisy appears, it shows up in the dashboard (and Telegram channel, I always envolve telegram in every project).
The network: OpenWrt and why VLANs saved my sanity
OpenWrt was the fastest way to get proper segmentation at home without buying enterprise gear.
What I actually changed
/etc/config/network (rough idea; your device names will differ)
1
2
3
4
5
6
7
8
# IoT bridge/VLAN
config interface 'iot'
  option proto   'static'
  option ipaddr  '10.0.20.1'
  option netmask '255.255.255.0'
  option type    'bridge'

# Tag/untag on your switch ports as needed (device‑specific)
/etc/config/firewall
1
2
3
4
5
6
7
8
9
# Zone for IoT
config zone
  option name     'iot'
  option network  'iot'
  option input    'REJECT'   # no inbound to router
  option output   'ACCEPT'   # can reach WAN
  option forward  'REJECT'   # no lateral movement

# Allow just what you need (NTP, MQTT to cloud, etc.)
You can find all OpenWRT configuration here: GitHub → OpenWRT Configuration
Quick captures from the router (helped a lot while debugging TLS):
1
2
3
4
5
6
7
8
opkg update
opkg install tcpdump openssh-sftp-server

# Capture on the AP radio, single host filtered the 10.0.20.100 is ESP32 static IP
tcpdump -i phy0-ap1 -w /tmp/mtls_capture.pcap -n 'host 10.0.20.100'

# Pull the file
scp root@10.0.0.254:/tmp/mtls_capture.pcap ./captures/
When ever i face an issue with the network or the mTLS i start capturing in OpenWRT and start analysing in wireshark, and that was a game changer for me. Here are some of the captures i took while working on this project.
ESP32 side (LittleFS + WiFiClientSecure + PubSubClient)
1
2
3
4
5
6
7
8
9
10
11
12
13
14
15
16
17
18
19
20
21
22
23
24
25
26
27
28
29
30
31
32
33
34
35
36
37
38
39
40
41
42
43
44
45
46
47
48
49
50
51
52
53
54
55
56
57
58
59
60
61
62
63
64
65
66
67
68
69
70
71
72
73
74
75
76
77
78
79
80
81
82
83
84
85
86
87
88
89
90
91
92
93
94
95
96
97
98
99
100
101
102
103
104
105
106
107
108
109
110
111
112
113
114
115
116
117
118
119
120
121
122
123
124
125
126
127
128
129
130
131
132
133
134
135
136
137
138
139
140
141
142
143
144
145
146
147
148
149
150
151
152
153
154
155
156
157
158
159
160
161
162
163
164
165
166
167
168
#include <WiFi.h>
#include <WiFiClientSecure.h>
#include <PubSubClient.h>
#include <LittleFS.h>
#include <time.h>

// Wi-Fi network credentials (set your SSID and password)
const char* WIFI_SSID     = "IOT_VLAN_SSID";
const char* WIFI_PASSWORD = "00001111";

// ThingsBoard MQTT server details
const char* THINGSBOARD_HOST = "mqtt.eu.thingsboard.cloud";  // adjust for region if needed, e.g. "mqtt.eu.thingsboard.cloud"
const uint16_t THINGSBOARD_PORT = 8883;

// File paths in LittleFS
const char* CA_CERT_PATH     = "/aaa.pem";
const char* CLIENT_CERT_PATH = "/cert.pem";
const char* PRIVATE_KEY_PATH = "/key.pem";

// Global variables for TLS certificate contents
String caCert;
String clientCert;
String privateKey;

// WiFi and MQTT clients
WiFiClientSecure secureClient;
PubSubClient mqttClient(secureClient);

// Function to read a text file from LittleFS into a String
bool readFileToString(fs::FS &fs, const char* path, String &dest) {
  File file = fs.open(path, "r");
  if (!file) {
    Serial.printf("Failed to open file: %s\n", path);
    return false;
  }
  dest.clear();
  // Reserve capacity to avoid fragmentation (optional)
  dest.reserve(file.size());
  while (file.available()) {
    // Read file character by character to preserve all contents (including newlines)
    dest += char(file.read());
  }
  file.close();
  // Debug: print file size loaded
  Serial.printf("Loaded %s (%d bytes)\n", path, dest.length());
  return true;
}

// Ensure time is initialized (required for TLS)
void syncTime() {
  configTime(0, 0, "pool.ntp.org", "time.nist.gov");  // UTC timezone
  Serial.print("Synchronizing time via NTP");
  struct tm timeinfo;
  const uint8_t MAX_RETRIES = 30;
  uint8_t attempt = 0;
  // Wait for time to be set or until MAX_RETRIES reached
  while (attempt < MAX_RETRIES) {
    if (getLocalTime(&timeinfo)) {
      Serial.println(" - Time synchronized!");
      Serial.printf("Current time: %04d-%02d-%02d %02d:%02d:%02d UTC\n",
                    timeinfo.tm_year + 1900, timeinfo.tm_mon + 1, timeinfo.tm_mday,
                    timeinfo.tm_hour, timeinfo.tm_min, timeinfo.tm_sec);
      return;
    }
    Serial.print(".");
    delay(500);
    attempt++;
  }
  Serial.println(" - Failed to synchronize time!");
}

// Attempt to (re)connect to ThingsBoard MQTT
void reconnectMQTT() {
  // Generate a unique client ID based on MAC address
  String clientId = "ESP32-";
  clientId += WiFi.macAddress();
  clientId.replace(":", "");  // remove colons from MAC

  while (!mqttClient.connected()) {
    Serial.print("Connecting to ThingsBoard MQTT...");
    // Note: using client certificate authentication, no username/password required
    if (mqttClient.connect(clientId.c_str())) {
      Serial.println(" connected.");
      // You can subscribe to topics or publish a message here if needed
    } else {
      Serial.printf(" failed, rc=%d. Retrying in 5 seconds...\n", mqttClient.state());
      delay(5000);
    }
  }
}

void setup() {
  Serial.begin(115200);
  delay(100);  // small delay to let Serial init

  Serial.println();
  Serial.println("=== Device booting... ===");

  // Initialize LittleFS
  Serial.println("Mounting LittleFS...");
  if (!LittleFS.begin()) {
    Serial.println("ERROR: LittleFS Mount failed! Halting.");
    while (true) { delay(100); }
  }
  Serial.println("LittleFS mounted successfully.");

  // Load TLS certificates/keys from LittleFS
  Serial.println("Reading TLS credentials from LittleFS...");
  bool ok = true;
  ok &= readFileToString(LittleFS, CA_CERT_PATH, caCert);
  ok &= readFileToString(LittleFS, CLIENT_CERT_PATH, clientCert);
  ok &= readFileToString(LittleFS, PRIVATE_KEY_PATH, privateKey);
  if (!ok) {
    Serial.println("ERROR: Failed to load one or more PEM files. Check LittleFS contents.");
    while (true) { delay(100); }
  }

  // Connect to Wi-Fi
  Serial.printf("Connecting to WiFi SSID: %s\n", WIFI_SSID);
  WiFi.begin(WIFI_SSID, WIFI_PASSWORD);
  // Wait for connection
  uint8_t attempt = 0;
  while (WiFi.status() != WL_CONNECTED) {
    delay(500);
    Serial.print(".");
    if (++attempt % 40 == 0) {  // print a newline every 40 * 0.5s = 20s
      Serial.println();
    }
  }
  Serial.println("\nWiFi connected.");
  Serial.print("IP address: ");
  Serial.println(WiFi.localIP());

  // Sync time for TLS
  syncTime();

  // Configure the secure client with certificates
  Serial.println("Configuring TLS credentials...");
  secureClient.setCACert(caCert.c_str());
  secureClient.setCertificate(clientCert.c_str());
  secureClient.setPrivateKey(privateKey.c_str());

  // Optionally, disable certificate verification for testing (NOT recommended in production)
  // secureClient.setInsecure();  // **Do not use in production, for debug only**

  // Configure MQTT server and port
  mqttClient.setServer(THINGSBOARD_HOST, THINGSBOARD_PORT);
  // Optionally, set callback for incoming messages (not used in this example)
  // mqttClient.setCallback(mqttCallback);

  // Attempt initial MQTT connection
  reconnectMQTT();
}

void loop() {
  if (!mqttClient.connected()) {
    reconnectMQTT();
  }
  mqttClient.loop();

  static unsigned long lastSend = 0;
  if (millis() - lastSend > 10000) {
    lastSend = millis();
    const char* payload = "{\"temperature\":99}";
    mqttClient.publish("v1/devices/me/telemetry", payload);
    Serial.println("↗ Published telemetry to ThingsBoard");
  }
}
CLI smoke test (good for diagnosing TB profile issues):
1
mosquitto_pub -d   -h mqtt.eu.thingsboard.cloud -p 8883   --cafile /etc/ssl/certs/ca-certificates.crt   --cert   ~/ca/clients/esp32_01/esp32.cert.pem   --key    ~/ca/clients/esp32_01/esp32.key.pem   -i esp32-01-$(date +%s)   -t v1/devices/me/telemetry -m '{"diag":"ok"}'
If you see (5) not authorised, re‑check the Device Profile and CA. If you see (2) identifier rejected, simplify the -i value.
Detection: Suricata IDS + Cowrie honeypot (and a tiny dashboard)
I run both on the Pi (Docker for Cowrie). Suricata watches the IoT VLAN/default LAN; Cowrie attracts the bored internet.
Suricata essentials
/etc/suricata/suricata.yaml (the bit everyone forgets)
1
2
3
4
vars:
  address-groups:
    HOME_NET: "[10.0.20.0/24, 10.0.0.0/24]"
    EXTERNAL_NET: "!$HOME_NET"
Update rules and start:
1
2
3
sudo suricata-update
sudo systemctl enable --now suricata
sudo suricata -T -c /etc/suricata/suricata.yaml   # test config
Generate a harmless alert to validate pipeline:
1
curl http://testmyids.com         # should fire GPL ATTACK_RESPONSE in eve.json
If you don’t see it in your dashboard: confirm eve.json path/permissions, HOME_NET ranges, and that your parser selects event_type == "alert".
Cowrie in Docker
1
docker run -d --name honeypot-container   -p 22:2222 -p 23:2223   -v ~/cowrie_data:/cowrie/var   --restart always cowrie/cowrie
I pull the structured log from the container and display sessions (successful/failed logins, commands tried) in a Flask view next to the IDS table.
The Six-Day War: Debugging the ESP32 mTLS Connection
This was, without a doubt, the most challenging part of the project. I had a working network, a working CA, and a working cloud endpoint. My mosquitto_pub test from the Raspberry Pi—using the exact same certificates—connected to ThingsBoard flawlessly.
Yet, the ESP32 refused to connect, repeatedly failing with a generic rc=-2 error. This kicked off a 6-day debugging marathon.
- Was it the firewall? No, the
mosquitto_pubtest proved traffic could get through. - Was it the certificates? No, the
openssl verifycommand and themosquitto_pubtest proved the chain of trust was perfect. - Was it the ESP32’s clock? This was a major issue. TLS certificates require accurate time. The initial code was failing because the ESP32’s clock wasn’t synchronized. I fixed this by adding NTP time sync logic. The error persisted.
- Was it the DNS? The time sync was failing because the ESP32 couldn’t resolve
pool.ntp.org. I bypassed this by using a direct IP (216.239.35.0). The error still persisted.
The final breakthrough came from analyzing Wireshark captures of the failed handshakes. The ESP32 was establishing a TCP connection and then immediately sending a [FIN, ACK] packet to tear it down before the TLS handshake even began. This pointed to one final culprit: RAM exhaustion. The ESP32’s WiFiClientSecure library was likely failing to allocate enough memory to handle the multiple large certificates required for the handshake.
The final, working code came from researching alternative MQTT libraries and finding a more memory-efficient implementation that could successfully complete the handshake.
The “After” Picture: A Secure, Encrypted Tunnel
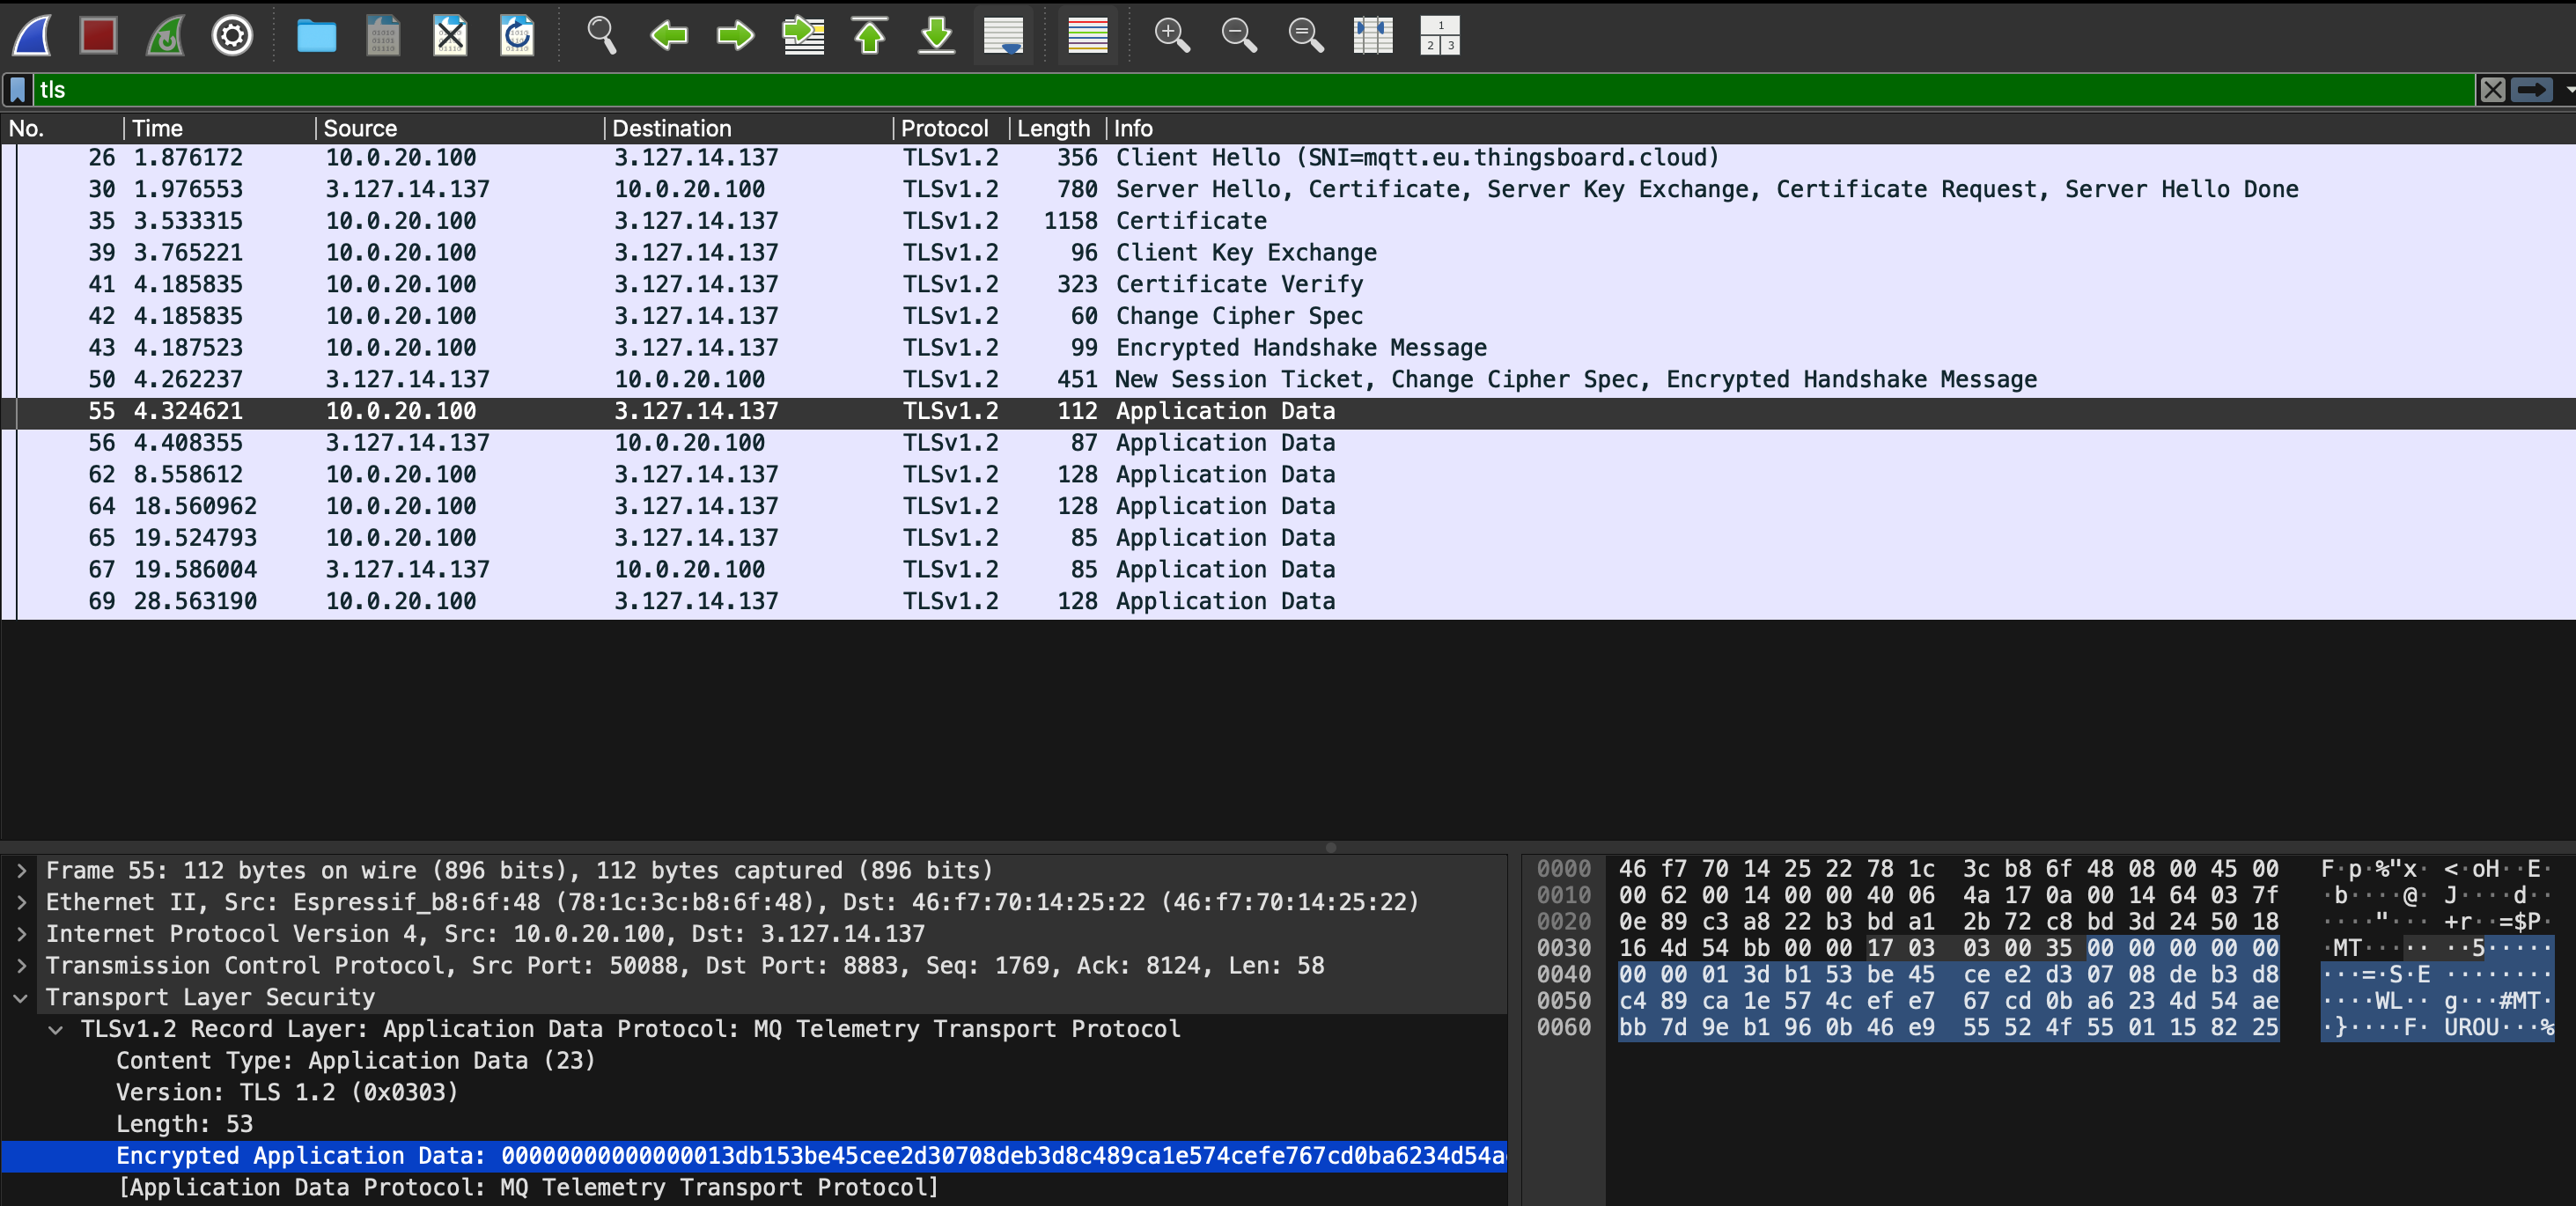
With the final code, it all came together. The ESP32 connected, and another Wireshark capture showed the beautiful result.
Success: The MQTT traffic is now unreadable, hidden inside a secure TLSv1.2 tunnel.
As you can see, Wireshark no longer identifies the protocol as “MQTT.” It only sees TLSv1.2. The sensitive data is now hidden inside the “Encrypted Application Data” payload. This is the tangible proof of end-to-end encryption.
Performance notes (real numbers)
Implementing comprehensive security doesn’t require expensive hardware:
- Raspberry Pi 5 (8GB): 6% CPU usage with full security stack
- OpenWrt Router (256MB RAM): Handles 50-70 IoT devices
- ESP32: <5% overhead for TLS encryption
- Total Cost: ~$162 USD for complete infrastructure
Comparison with Enterprise Solutions
| Feature | Our Implementation | Enterprise Solution | Cost Difference |
|---|---|---|---|
| Network Segmentation | OpenWrt VLANs | Cisco/Juniper | -$5,000+ |
| Certificate Authority | OpenSSL | Microsoft CA | -$2,000+ |
| IDS/IPS | Suricata | Cisco Firepower | -$10,000+ |
| Honeypot | Cowrie | Commercial | -$1,000+ |
| Total Savings | $162 | $18,000+ | $17,838 |
Deployment Guide: From Lab to Production
Phase 1: Network Foundation
- Deploy OpenWrt router with VLAN configuration
- Implement firewall rules and access controls
- Test network isolation thoroughly
Phase 2: Security Infrastructure
- Setup Raspberry Pi with Docker
- Deploy Certificate Authority (ephemeral container)
- Install and configure Suricata IDS
- Deploy Cowrie honeypot
Phase 3: Device Integration
- Generate device certificates
- Implement TLS communication
- Configure cloud platform integration
- Test end-to-end encryption
Phase 4: Monitoring and Maintenance
- Setup alerting systems
- Configure log aggregation
- Implement backup procedures
- Schedule security updates
What I’d improve next
- Automatic cert rotation (short‑lived certs) + revocation (CRL isn’t supported in ThingsBoard, so I need a work around)
- Anomaly detection on Suricata flows (stats first, ML later)
- A proper Grafana view on top of eve.json + Cowrie
Appendix: quick OpenWrt cheats I kept using
1
2
3
4
5
6
7
8
9
# See routes and VLAN interfaces
ip a; ip r

# Verify DNS/SNI reachability to TB
nslookup mqtt.eu.thingsboard.cloud
openssl s_client -connect mqtt.eu.thingsboard.cloud:8883 -servername mqtt.eu.thingsboard.cloud -alpn mqtt

# Copy pcaps off the router
scp root@10.0.0.254:/tmp/mtls_capture.pcap .
You can absolutely do it at home with open‑source tools and a weekend. (EVIL LAUGH, you will hate me after that weekend for sure)
I believe in the power of open source and sharing knowledge. I’ve documented the entire process and made all the configuration files and code available on my GitHub repository.
About the Author
I’m Radouane ELHAJALI, i have a bachlores in IoT and network security. This project was completed as part of my degree in IoT and Intelligent Systems.
Connect with me:
- LinkedIn: (https://www.linkedin.com/in/elhajali-radouane/)
- GitHub: (https://github.com/RadouaneElhajali)
- Email: rdwnlocal@proton.me
Keywords: Zero Trust IoT, IoT security architecture, cybersecurity for IoT devices, MQTT security, TLS encryption, network segmentation, VLAN configuration, Suricata IDS, Cowrie honeypot, certificate authority, ESP32 security, Raspberry Pi security, mTLS authentication, IoT threat detection, enterprise IoT security